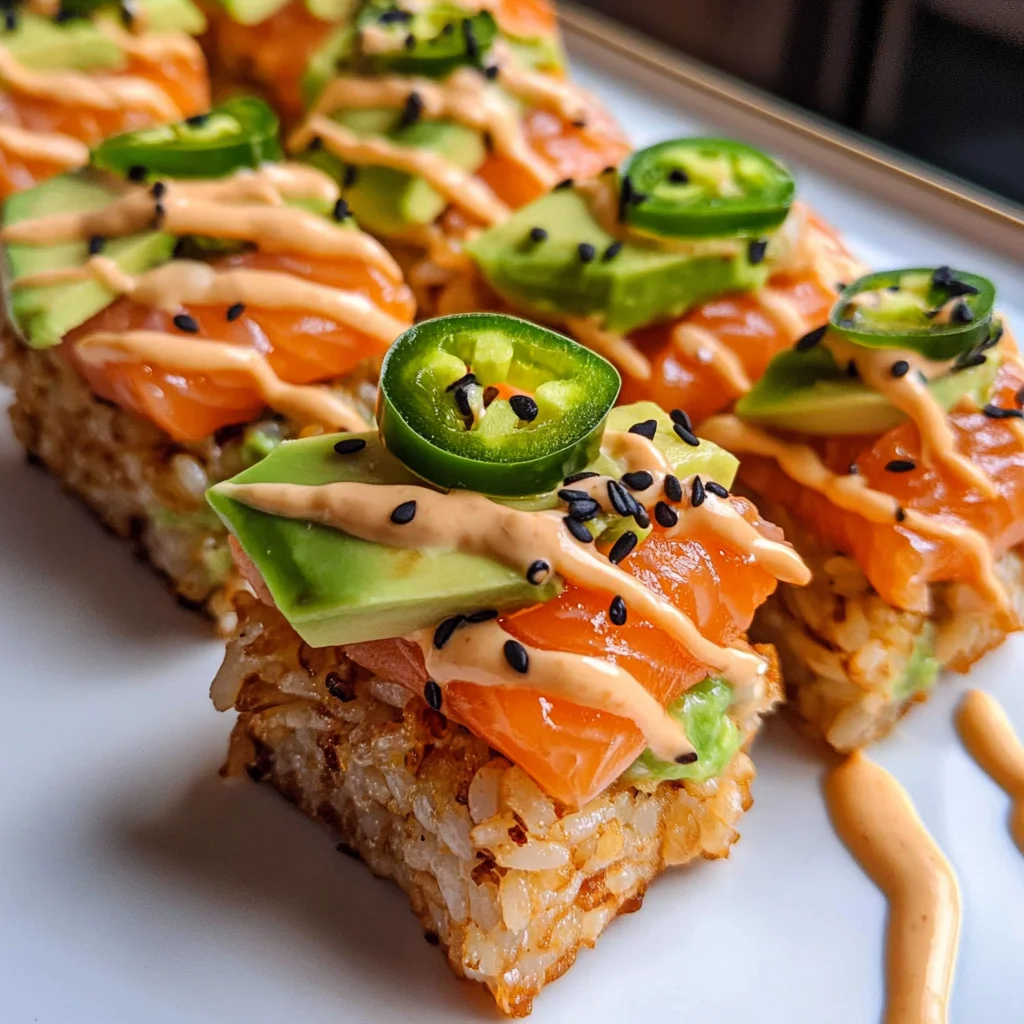
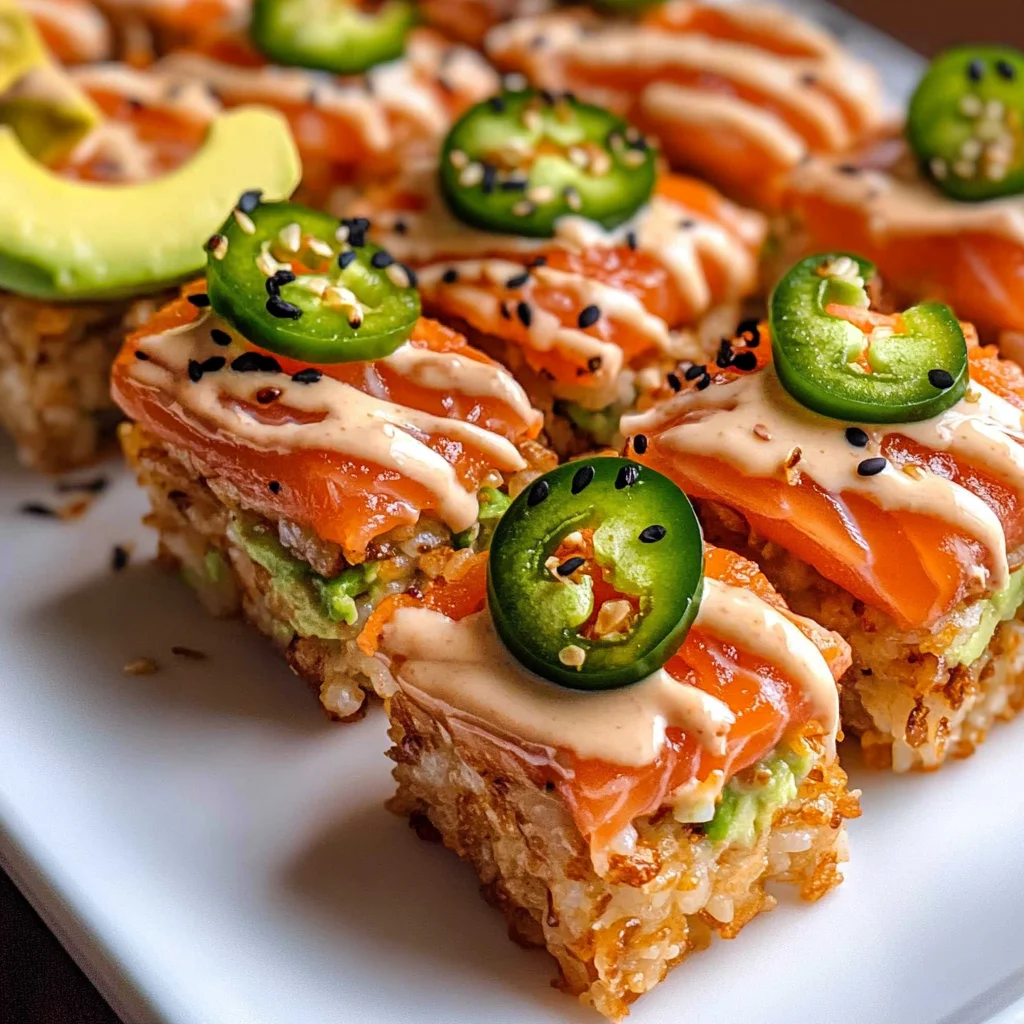
Salmon Crispy Rice
Salmon Crispy Rice is a delightful fusion dish that combines the crispy texture of fried sushi rice with fresh, flavorful salmon. This recipe is perfect for gatherings, appetizers, or even a light meal. Its unique blend of creamy sauces and toppings elevates simple ingredients into a gourmet treat that will impress your guests.
Why You’ll Love This Recipe
- Easy to Make: With just a few simple steps, you can create a stunning dish that looks and tastes like it came from a restaurant.
- Flavor Explosion: The combination of savory salmon, spicy Sriracha, and creamy Kewpie mayo creates an unforgettable flavor profile.
- Perfect for Any Occasion: Whether it’s a party, family dinner, or casual gathering, this dish fits right in.
- Customizable Toppings: Add your favorite toppings like avocado and jalapeño to make it your own!
- Impressive Presentation: The beautiful layers and colors make Salmon Crispy Rice not only delicious but also visually appealing.
Tools and Preparation
To prepare Salmon Crispy Rice efficiently, having the right tools is essential.
Essential Tools and Equipment
- Non-stick frying pan
- Mixing bowls
- Baking pan
- Plastic wrap
- Sharp knife
Importance of Each Tool
- Non-stick frying pan: Ensures easy cooking and cleanup when frying the rice.
- Mixing bowls: Necessary for combining ingredients thoroughly without mess.
- Baking pan: Helps shape the rice evenly so it can be cut into perfect squares later.
Ingredients
For the Sushi Rice
- 3 cup Cooked Sushi Rice (short grain rice)
- 2 tbsp Rice Vinegar
- 1 tbsp Sugar
- 1 tsp Salt
- Vegetable Oil (for frying)
For the Salmon Topping
- 1 lb Sushi-grade Salmon
- 4 tbsp Kewpie Mayo
- 2 tbsp Sriracha
- 2 tbsp Scallion
For Garnishing
- 2 tsp Soy Sauce
- 2 tsp Sesame Oil
- Sliced Avocado
- Jalapeno (thinly sliced)
- Black and White Sesame Seed (toasted)
How to Make Salmon Crispy Rice
Step 1: Prepare the Sushi Rice
- In a small mixing bowl, combine rice vinegar with sugar and salt. Stir until dissolved.
- Pour the rice vinegar mixture over cooked sushi rice and mix until well combined.
Step 2: Shape the Rice
- Transfer the seasoned rice to a baking pan lined with plastic wrap.
- Gently press the rice down to even it out.
- Cover with plastic wrap and chill in the fridge for at least 4 hours or overnight.
Step 3: Fry the Rice
- Heat vegetable oil in a non-stick frying pan over medium heat.
- Cut chilled rice into squares or rectangles and carefully place them in the hot oil.
- Fry until both sides are golden brown and crispy.
Step 4: Assemble Your Dish
- Slice sushi-grade salmon into thin pieces.
- Mix Kewpie mayo with Sriracha in a separate bowl for drizzling later.
- Place fried rice pieces on a serving platter, top each piece with salmon, and drizzle with spicy mayo mixture.
- Garnish with scallions, sliced avocado, jalapeño, soy sauce, sesame oil, and toasted sesame seeds.
Now you have a delicious Salmon Crispy Rice ready to serve! Enjoy your culinary creation!
How to Serve Salmon Crispy Rice
Salmon Crispy Rice is a delightful dish that can be served in various ways to enhance your dining experience. Whether as an appetizer or part of a main course, these serving suggestions will elevate your meal.
As an Appetizer
- A perfect bite-sized portion to kick off your meal. Pair it with dipping sauces for an extra flavor boost.
With a Side Salad
- Fresh greens, like arugula or mixed greens, offer a crisp contrast to the rich flavors of the salmon and rice.
Topped with Extra Garnishes
- Enhance the presentation and flavor by adding sliced avocado, jalapeños, or a sprinkle of toasted sesame seeds on top.
As Part of a Sushi Platter
- Combine Salmon Crispy Rice with other sushi items for a colorful and diverse platter that’s great for sharing.
With Dipping Sauces
- Serve alongside soy sauce, wasabi mayo, or ponzu sauce for guests to customize their bites.
How to Perfect Salmon Crispy Rice
To achieve the best Salmon Crispy Rice, follow these helpful tips that ensure perfect texture and taste.
- Use sushi-grade salmon: This ensures freshness and safety, providing the best flavor and texture for your dish.
- Chill the rice properly: Allowing the rice to cool in the fridge helps it firm up, making it easier to cut into squares.
- Fry at the right temperature: Ensure your oil is hot enough before frying; this creates that crispy outer layer while keeping the inside soft.
- Press rice gently: When transferring rice to the baking pan, press gently. Too much pressure may make it too dense.
- Experiment with toppings: Don’t hesitate to add different garnishes like microgreens or citrus zest for added freshness.
Best Side Dishes for Salmon Crispy Rice
Complement your Salmon Crispy Rice with these delicious side dishes that enhance your meal’s overall experience.
-
Miso Soup
A warm bowl of miso soup adds comforting flavors that pair well with sushi-style dishes. -
Edamame
Lightly salted edamame makes for a nutritious and protein-rich side that’s easy to prepare. -
Cucumber Salad
A refreshing cucumber salad dressed in rice vinegar balances the richness of the salmon perfectly. -
Seaweed Salad
This tangy and slightly sweet salad brings umami flavors that enhance your seafood experience. -
Pickled Vegetables
A variety of pickled vegetables provide crunch and acidity, cutting through the richness of the dish. -
Tempura Vegetables
These light and crispy battered vegetables add texture and are fun to share among diners.
Common Mistakes to Avoid
When making Salmon Crispy Rice, there are a few common pitfalls to dodge for the best results.
- Incorrect Rice Preparation: Using the wrong type of rice can lead to poor texture. Always use short-grain sushi rice for that sticky consistency.
- Skipping Marination: Failing to marinate the salmon can result in bland flavor. Ensure you let the salmon soak in the marinade for at least 15 minutes before cooking.
- Overcrowding the Pan: Frying too many rice squares at once can lower the oil temperature. Fry in smaller batches to achieve a perfect crispiness.
- Not Cooling the Rice: If you don’t let the rice cool enough, it may not hold its shape when frying. Chill the rice for several hours to set properly.
- Ignoring Garnishes: Skipping garnishes like scallions and sesame seeds leads to less visual appeal. Always finish with fresh toppings for added flavor and presentation.
Storage & Reheating Instructions
Refrigerator Storage
- Store Salmon Crispy Rice in an airtight container.
- It will last for up to 3 days in the fridge.
Freezing Salmon Crispy Rice
- Wrap individual pieces tightly in plastic wrap or foil.
- Freeze for up to 1 month; this helps maintain quality.
Reheating Salmon Crispy Rice
- Oven: Preheat to 350°F (175°C) and heat on a baking sheet until warmed through, about 10-15 minutes.
- Microwave: Place a damp paper towel over a plate of rice and microwave in intervals of 30 seconds until heated.
- Stovetop: Heat a non-stick pan over medium heat; add a bit of oil and warm each piece until crispy again.
Frequently Asked Questions
Here are some common queries about Salmon Crispy Rice that you might find helpful.
What is Salmon Crispy Rice?
Salmon Crispy Rice is a delightful dish made of crispy fried rice topped with savory sushi-grade salmon, perfect as an appetizer or snack.
How do I ensure my Salmon stays fresh?
Always buy sushi-grade salmon from a reputable source and keep it refrigerated before using it in your recipe.
Can I customize my Salmon Crispy Rice?
Absolutely! Feel free to add toppings like mango, cucumber, or different sauces based on your preferences.
How long does it take to prepare Salmon Crispy Rice?
The total preparation time is about 45 minutes, including chilling time for the rice.
Final Thoughts
Salmon Crispy Rice is not only delicious but also versatile. You can adapt it with various toppings and sauces to suit your taste. Give this recipe a try—your friends and family will love it!
Salmon Crispy Rice
Salmon Crispy Rice is a delectable fusion dish that combines the satisfying crunch of fried sushi rice with the delicate flavors of fresh salmon. This recipe is perfect for any gathering, whether as an appetizer or a light meal, and it’s guaranteed to impress your guests with its gourmet appeal. The unique blend of creamy sauces and vibrant toppings elevates simple ingredients into a stunning culinary experience. You’ll love how easy it is to prepare and how customizable it can be with your favorite garnishes.
- Prep Time: 15 minutes
- Cook Time: 15 minutes
- Total Time: 30 minutes
- Yield: Approximately 12 servings 1x
- Category: Appetizer
- Method: Frying
- Cuisine: Fusion
Ingredients
- 3 cup Cooked Sushi Rice (short grain rice)
- 2 tbsp Rice Vinegar
- 1 tbsp Sugar
- 1 tsp Salt
- Vegetable Oil (for frying)
- 1 lb Sushi-grade Salmon
- 4 tbsp Kewpie Mayo
- 2 tbsp Sriracha
- 2 tbsp Scallion
- 2 tsp Soy Sauce
- 2 tsp Sesame Oil
- Sliced Avocado
- Jalapeno (thinly sliced)
- Black and White Sesame Seed (toasted)
Instructions
- In a bowl, mix rice vinegar, sugar, and salt until dissolved. Combine with cooked sushi rice.
- Transfer seasoned rice to a baking pan lined with plastic wrap; press down gently and chill for at least 4 hours.
- Heat vegetable oil in a non-stick pan over medium heat. Cut chilled rice into squares and fry until golden brown on both sides.
- Slice the salmon thinly, mix Kewpie mayo with Sriracha, then assemble by placing salmon on fried rice squares and drizzling with the spicy mayo. Garnish with scallions, avocado, jalapeño, soy sauce, sesame oil, and toasted sesame seeds.
Nutrition
- Serving Size: 1 square (45g)
- Calories: 220
- Sugar: 2g
- Sodium: 300mg
- Fat: 10g
- Saturated Fat: 1g
- Unsaturated Fat: 8g
- Trans Fat: 0g
- Carbohydrates: 28g
- Fiber: 1g
- Protein: 7g
- Cholesterol: 20mg